Showing posts with label Self-made. Show all posts

Monday, 30 November 2015

//WHITE COTTON SHIRT


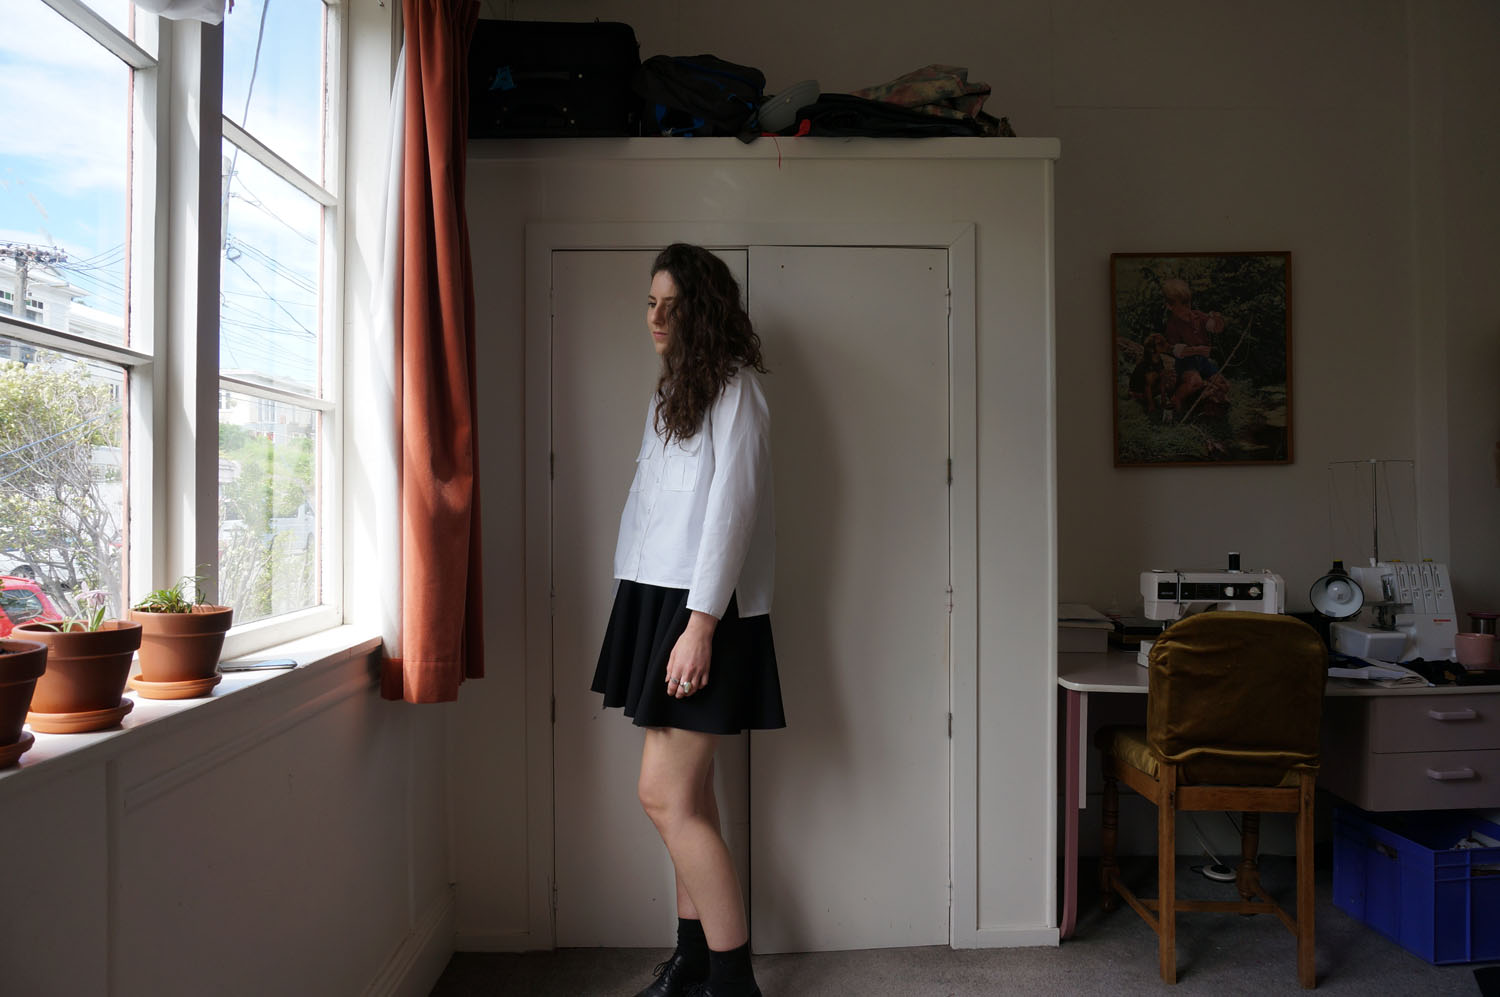
To start with: I need to admit that this shirt came about through the purchase of a fast-fashion, RTW shirt from Topshop.

A few months ago I found myself in desperate need of a white shirt at short notice. After coming to the conclusion that it wouldn’t be possible to whip one up myself in the timeframe I had, I relented and purchased one from said chain store. While feeling slightly let down with myself (what happened to my no fast fashion goal?) it did set me on a journey of many shirts.

I kind of fell in love with my Topshop shirt. It filled a white-shirt-sized gap I didn’t realise I had in my wardrobe and I wore it frequently. At least until the fabric started pilling six weeks in and it started to look a little sad.

To cut a long story short, I didn’t realise the extent that white shirts (or rather tailored, collared shirts in general) fitted with my style and this has set me on course to creating my own pattern that I can use as a base for a variety of different shirts.


This particular shirt was made straight from the shirt pattern in Winifred Aldrich’s Metric Pattern Cutting. I intended to make up a wearable muslin simply because there’s a fair amount of work involved in sewing a shirt (collar, stand, placket anyone?) and it seemed silly to spend that time on a garment that has no wearability at all. Instead, I thought I’d take my chances and use a proper shirting fabric and hope it turned out wearable in some sense.

And it actually turned out pretty well.


The fabric is a cotton from the Fabric Store, and it’s the perfect weight for what I was wanting. It’s not super thin or flimsy and it crisps up well after a good pressing. It’s also got enough body to hang away from my body and not drape too much.


Pattern

I pretty well followed the pattern instructions in the book, and only made a few adjustments. 

I omitted the yoke as I couldn’t be bothered with one for a muslin and I didn’t think it was all that necessary. There is a little bit of bagging around the shoulders/ back of the neck, but I can’t tell if that’s related to the lack of yoke or a problem with the neckline depth.


I drew my own collar shape, which is slightly pointier than I was intending but I’m still happy with it.

I directly copied the breast pockets from the Topshop garment. I think that most shirts need detail on the front somewhere to add interest and compliment the collar and it looked strange without pockets. This is also helpful in averting any problems with see-through fabric!


I made a pattern for the cuffs, but didn’t end up using it. During the trying-on stage, I decided that the sleeves were too full to be pleated into a cuff without looking puffy and unflattering , and to be happy with them I would have to draft a slimmer sleeve. However, I really liked the look of them uncuffed and at the length that they were, so I set about doing a super narrow hem to keep them this way. I think this adds a real point of difference to most of the RTW shirts I’ve seen and the sleeves are one of my favourite parts of the shirt.


Sewing

This shirt is one of my first attempts at a decent collar and some tailoring; besides my Alder shirtdress I’ve never really delved much into that side of sewing. I was kind of gung ho when I started this, but it turned out pretty well. I’m not sure I’m doing this tailoring business right, I’m kind of winging it, but I think these skills will improve as I make more shirts.

I decided early on that if I wanted this to pass as a proper garment then French seams were important. I’ve sewn them on a few garments in the past so they were no real issue. While I did have a minor freak out when I thought the sleeves wouldn’t fit into the armscye, a lot of pins helped me realise that they actually would!


Next time

The collar on this shirt is not perfect. I’m happy with the general size of it, but I think I’ll make it with a slightly shallower point next time. It also overlaps by a few millimetres  at the centre front. I think this is down to a double up of seam allowances or something similar when I was tracing the pattern, but it’s easily remedied next time.

Wearability

I wear this shirt All. The. Time. It fits in really well into my wardrobe; I usually pair it with culottes or the black skirt pictured above, but it also works well under a corduroy Sway dress I’ve made. It works in that it’s boxy but not so boxy that it bunches up under other layers or jackets. It’s a winner in my books!


A Journey of Many Shirts

As a wearable muslin, I’m pretty happy with this shirt. I’ve since made up a shirt as part of my Spring Summer ’15 plans (here and here) based on this pattern with a few alterations and it’s turned out well. I have a few more shirts planned for my summer sewing and they’ll all have this pattern as a base. I’ve christened this the Journey of Many Shirts.

Until next time!

Thursday, 26 February 2015

//COTTON CAROLYN PAJAMAS


Firstly, can I just say I never imagined photographing myself in my pajamas and then posting said photos to the internet. But, then again, I’ve never had pajamas as snazzy as this. My prior sleeping attire consisted almost entirely of band tee shirts. So it was very exciting when Heather released her Carolyn Pajama pattern, and excellent timing as I’d just moved to Wellington, which has a decidedly colder climate than I’m used to, and requires warmer sleepwear.

Pattern

I love this pattern. I like the different options it gives, and it’s classic with a really nice shape to it. 
And then there’s the piping! Phwoar!

I chose to make the long sleeved top with shorts and I’m tempted to also make a matching pair of pants for when it gets colder.

I found the pattern to run a little on the small side, but to be fair I do have a peculiar pear-shaped body. I used the measurement chart and cut the top in a size 6 and initially cut out the shorts pattern in a size 8. I made the top up first and it fitted nicely across the shoulder but was a little tight across the hips so I narrowed the seam to 5mm from the waist to hem on the side seams. I then got a little nervous about using an 8 for the shorts so recut the pattern as a size 12. When I made these up they were a bit tight so I narrowed the seams as much as possible at the side, centre back, and crotch seams. They’re still a little more snug than I’d like but I’m pretty happy with the fit.


Other alterations I made were to lengthen the shorts by 1cm and I added piping to the pocket edge. I’m still tossing up about whether or not to add three buttons to the faux fly (read: I will when I can be bothered).

I toyed with shortening the cuffs as they cover most of my hands, but I’m glad I didn’t. They’ve got a cosy pajama vibe. However, if I was to make an outside-wear version I think I would shorten them.

Sewing

This was my first time working with piping and I’m really pleased with the results. I ended up making around six metres of piping, which involved a few fabric strips cut on the bias (not fun) and initially my stitching line was miles from the piping cord. Once I stitched it to the fabric however, it came out ok. There are a couple of places where it’s not totally pucker-free but it’s not really noticeable.

The topstitching around the piping looks pretty puckered and a bit shonky in these photos but I’m attributing that to that fact they’d just come out of the dryer when I took these photos and they may have shrunk slightly. I’ve since worn them and they’ve gone back to normal!

Fabric

The fabric is an almost-brushed cotton from the Fabric Store. I snapped it up when they had 50% off so I think it was down to $10 a metre. It’s lovely and warm and I love navy so it was ideal for my needs. I looked at white piping but in the end decided on pink. I got the piping fabric and cord from Spotlight. The fabric is a cheap poly satin but it keeps snagging on everything so next time I might go with a cotton for the piping.

Next time:

-          I will go up a size for the shorts and add 1cm onto the side seam of the top so the fit is spot on
-          Lengthen the shorts by a centimetre or two
-          Maybe raise the top buttonhole by an inch. I have no bust to speak of so the neckline's a little low for me (and yes, I should have checked this before sewing my buttonholes)
-          I considered monogramming my initials onto the pockets in pink after I made the top up. I decided against it though, because I thought it may look a bit cramped with the pocket being split into two parts. Next time I’ll omit the piping and maybe have it along the outside of the pocket instead to frame the monogramming.
-          When summer next rolls around - in approximately nine whole months - I’m definitely making a silk pair. Pale pink with navy piping? Printed crepe de chine? I’m getting excited already...

Wearability

I desperately need another pair already so I can stop wearing these so often! They’re lovely and warm and look too nice to just be wearing to bed. I’m certainly tempted by Heather’s suggestion to make a silk set for outside wear. Or I was thinking of making the collar point a bit more square to lessen to pajama connotations and making the top into a blouse. Either way, this project has made me realise I need more piping in my life! I am a little worried I’ll end up looking like an extra in a cowboy movie. I guess white with black piping is a good start? And omitting any fringing and yoke will certainly help! 

As a coincidence, a few days after I finished my pair, I stumbled across this set from NZ label Lonely Hearts. They are amazing but cost a small fortune ($415). Admittedly, I felt rather smug when I totalled mine at a mere $35 (yay for handmade stuff and the $$ saved). I may just keep a sneaky eye out for a similar floral print for the future though, it makes for quite a different look.

Source
UPDATE: Lonely have done a navy set very similar to mine, they used cream piping though. In my opinion, their neckline looks a little too high.  (or am I secretly just envious)

Anyway, I guess this means that for once in my life I’m bang on trend?!

Wednesday, 11 February 2015

//LINEN TWO PIECE SET-ACULAR

Hi everyone!

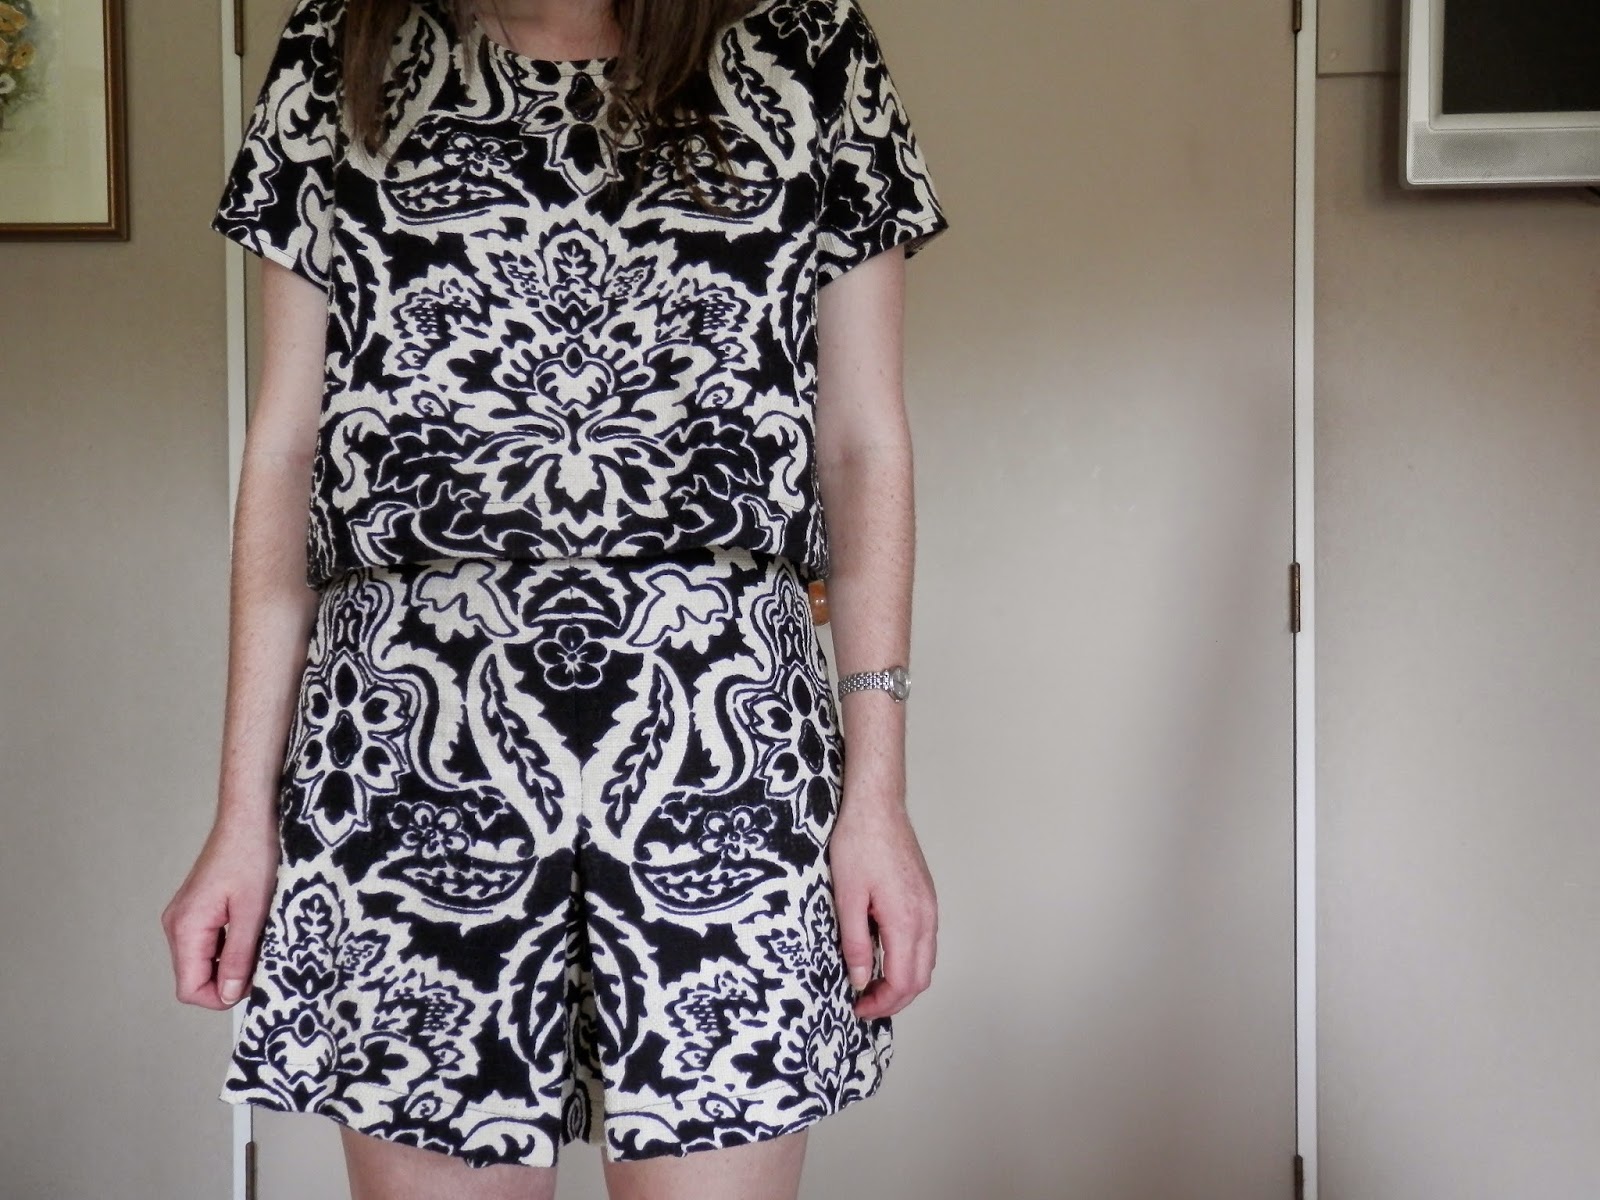
May I present to you my VISUALLY LOUD TWO-PIECE.

I was totally enamoured with Sophie’s two piece outfits last year as well as all the fab ones she inspired. So here’s my addition to the Two-Piece Set-Acular club! Better late than never, right?!


Fabric

This fabric is amazing. It’s a thick-ish textured linen-cotton mix from the Fabric Store.  It’s incredibly comfortable to wear and just the right combination of soft and thick. The cotton content has more or less eliminated crinkles.

Then there’s the fabric’s  pattern - which can speak for itself (and in quite a loud voice!). My favourite twin-sets to come out of Sophie’s campaign were the patterned, bright ones. (I made another twin-set a few weeks ago from a plain navy linen but it’s just not as effective - it’s missing some ‘oomph’.) 

I got this particular linen about a month ago in some mail samples for another project, but it wasn’t right for that project. The idea of a twin set recently re-entered my consciousness and, hey presto, it was perfect.

In hindsight  - perfect twin-set fabric . Now all I want is this weight and texture in solid colours .


Pattern matching

I was wary of being swamped by the busy pattern, so from the outset decided to position my pattern symmetrically to add a focal point to the garments . I ensured that I cut each piece of the front and back of the shorts as a mirror image of the other front or back piece – that way when I sewed the pleat in the middle of the culottes it would match! However, had I been concentrating a bit more carefully I would have matched the side seams. I got distracted by the whole mirror image thing and didn’t realise that I could easily have cut the front and back identically so it matched at the sides as well! 

Ahh well, I guess pattern matching does that to you.


Pattern

The top pattern is Grainline Studio’s scout tee. I’ve made heaps of these and haven’t made any major adjustments to the pattern. For this I just cropped it and raised the neckline by 1cm.
The bottoms are a pair of culottes of my own pattern. It’s based on a culottes pattern in Winifred Aldrich’s book Metric Pattern Cutting which turns the skirt block into shorts and adds fullness to the front of the pattern - which is pleated to hide the short legs and make it look like a skirt. I’ve made this pattern a few times over summer and I’m quite fond of it. I’m not much of a shorts girl and culottes are a good compromise for me. I’m still quite unsure whether or not it’s a flattering shape for me but I’ve entered a culottes phase and there’s no turning back!


Sewing

This was lovely fabric to work with. I’ve made both the top and culottes before so whizzed through the sewing of them. I think all up it took me around a day of sewing to put together.

Yay vs nay

Yay

  • The fabric! Say no more
  • I think my pattern matching/making it symmetric worked well and draws the eye
  • I can wear both pieces with other (plain) garments without it looking strange – I can either go full pattern or wear it by halves.

Nay

  • There's been no real negatives in my wearing so far!


Wearability

This is a fun outfit to wear!

I lived in it for the first week after I made it, until I realised that the loud nature of the fabric made it pretty obvious to people the frequency I was wearing it! It’s super comfortable, and the fabric holds its shape nicely without being stiff. It is relatively warm given its thickness but it’s a nice fabric to have against the skin - yay for natural fibres!

It is a bit of a change for me to wear such a bold pattern, particularly a whole outfit of it, but I’m finding black and white a good place to start. I’ve just finished another twin-set - a pastel floral number - and I keep visualising what else I can turn into a twin-set from my stash.


Twin-set ideas

I delved deep into the world of twin-sets (and by that I mean Pintrest) when I was looking for ideas re pattern and shape, and here's some of my favourites:

How good is that Kirsten Dunst one?!?
Source: all from Pintrest


So many great ideas!
Source: all from 
Pintrest
More over on my Pintrest

I'm now scheming about all the different variations I could do - winter, summer, pastel, trimmed, tailored, a blazer - so I guess have the twin-set bug!

Friday, 30 January 2015

//LIBERTY SILK RIGEL BOMBER


Hello!
Here is my contribution to Rigel Bomber January!


Firstly, I need to say that I love this jacket! It’s probably in my top five self-made garments. 

I think the great thing about this pattern is that it works both with light-weight fabrics as well as heavier winter ones (as it says on the pattern description). I’m not one that would wear a varsity-style bomber jacket but I love the option of different styles that this pattern offers.


I made mine out of this Liberty of London printed silk satin, and lined it with navy silk habotai and used cotton ribbing, both from the Fabric Store.

The Liberty satin is gorgeous, and much better in real life than it looks on the Shaukat website. The line are incredibly fine and it's a colour scheme that's a bit different to most liberty prints.

I lined the pockets using a moss-coloured textured silk tissue I had lying around.


Changes to pattern

The only changes I made to the pattern were to line it and lengthen the ribbing on the sleeves.

I think this jacket really needs lining to hide the workings of the welt pockets. It’s a simple enough change to make but I think it gives a much more polished finish. If you’ve spent a bit of timing ensuring your welt pockets, zip etc. are perfect, I think it makes sense to carry that through to the inner of the jacket!

I followed a similar process as Katy and Laney, but machine instead of hand-sewed the bottom of the lining to the ribbing and turned it out through the sleeve gap.

Next time:

The length of the jacket is one designed to be worn with jeans and trousers I think. I don’t really wear trousers (I’m more of a dress girl) so with a thicker, less floaty fabric I’d crop the pattern so it looks better worn over a dress, with less bulk over the hips. I like the current length with this light, floaty-type of fabric though. 

Next time I might raise the neckline so it's more curved around the neck, but that depends on the fabric and look I'm after.


Sewing

There were no real issues sewing this. I was slightly apprehensive sewing such a slippery satin, but pins, pins and more pins and it came out fine!

I’d never sewn a welt pocket prior to this jacket, and was a bit nervous seeing as I didn’t have any spare fabric if I made a mistake. I just took it slow and after checking, and triple checking, the welt instructions I cautiously proceeded. The instructions were really clear and helpful though, and I needn’t have worried!


Yay vs Nay

Yay

  • I love this jacket. I think the pattern is great and works really well in a slouchy version (which is probably more to my style than a fitted one). I love the fabric and need to find a way to use more Liberty satin!

Nay

  • I probably could have made a smaller size and shortened it slightly for a snugger fit. I think the slouchy look suits this fabric, but for a thicker fabric I probably will change the fit of it.
  • The ribbing I used is 100% cotton which is great, but it means that it hasn’t got much recovery and quickly loses its close fit.
  • I regret not using the navy lining fabric for the welt pockets, as the fabric I used blends in too much. Navy pockets would have added a pop of contrast and been more effective.
  • Wearing this zipped up really doesn't work with my body shape!


I can't wait to see the other Rigels that come out of this month!


Friday, 23 January 2015

//WOOL ALDER DRESS


Hellooo!

This dress has been languishing unworn at the back of my wardrobe since I finished it around 6 weeks ago. Why? Because I’m currently in the midst of 30+ degree days and this dress is made of WOOL. These two variables aren’t particularly well-matched. However, I do like the dress so I’m sure it won’t be long until it gets more use.

When I first spotted this pattern online I was beyond excited. It was completely my style and I’d been half-pie looking for a decent shirtdress pattern for a while. (Don’t you just love when you find a pattern that’s right up your alley?) I set about urgently finding some fabric for it and even spent my lunch break cutting out and cello-taping the pattern together such was my keenness! 


I initially used a cheap navy wool-mix suiting-type fabric but I slowly came to realise this wasn’t the best choice for the gathered version as it was too stiff. I’d also just inherited an unfamiliar sewing machine which was uncooperative in the topstitching and left puckered seams. I couldn’t bring myself to finish it knowing I’d never wear something with such ugly seams.

A month or so after this failure I picked up this wool gauze (I think?) fabric at the Fabric Store’s bi-annual sale and immediately designated it as an Alder. In fairness, there’s probably more appropriate garments for this wool gauze but I had Alders on the mind! Plus, I loved the weight and pattern of the fabric.

Sewing

In terms of sewing, it was fairly straightforward but a bit more time-consuming than most of my sewing projects are. I decided early on that the gauze was on the wrong side of opaque and needed lining (cotton gauze? From the Fabric Store also), so basically sewed a whole other body of the dress (sans collar and pocket) and attached it under the collar stand, yoke, and button stands. I was also a bit tardy because I took my time and basted the pockets, collar etc. first to make sure they were perfect before topstitching, but I think this paid off.


The fabric was lovely to work with, and although it’s fairly loosely woven it didn’t cause me any grief. I was terrified about the buttonholes going into this because I’ve never had much luck with them in the past – mainly due to the machines I was using – and this required a whole TEN. However with the help of an automatic buttonhole foot and about 27 practice buttonholes it came out fine!

The pattern instructions were really easy to follow and the diagrams helpful! I drafted a smaller lining for the skirt with less fullness, but didn’t change anything else about the pattern. I cut a size 4 and although I’m pretty happy with the relaxed fit I may even go down to a size 2 (or make the bodice a tighter fit) next time because there is a bit of wriggle-room to do so!


Yay vs Nay

Yay


  • The biggest yay has to be the buttons. I picked up a bag of exactly the number and type I needed for a mere 30 cents in an op shop. It wasn’t until afterwards I looked closely at the bag and noticed it was meant to be $3.00. Oops.
  • In general I really love the design. Jen’s done a great job making it flattering, and I think it would suit most body shapes between the two versions. I love the tailored collar, yoke etc contrasting with the gathered skirt and scooped hem. (I’ve always been a sucker for a good gathered skirt).

Nay


  • I guess all I have to say in the nay column is that the fabric I chose isn’t exactly year-round suitable (at least not in my climate). So while the pattern is relatively summery, the fabric is suited to winter. 


Ahh well, it’ll been cold before too long. In the meantime - is it time for a summery linen version?

Monday, 19 January 2015

//HEMLOCK COLLECTION

1., 2. - Striped polyester knit
3., 4. -  Acrylic jersey


1., 2. - Merino and lurex woven, elbow patched + pocketed
3., 4. - Merino jersey knit


1., 2. - Merino and nylon cuffed pink panther jumper
3. - Stripe matching
4. - Hem band and cuffs

Hello folks!
I thought I'd share my Hemlock collection! 

I've used this pattern loads since Jen put it up for FREE (yay free pattern!) - it's super quick and easy to whip up and a great wardrobe staple (as I'm sure you all know).

I've made it up in both t shirt and jumper weights and they've all come out well.

Except for the woven version, I stitched all the seams using just my overlocker and finished with a twin-needle on the neckband and hems.

I've made a couple of normal length jumpers using the pattern, but I generally prefer to crop them so I can tuck them into skirts, dresses etc. I've also started to take a couple of inches off the side seams so they are slightly more close-fitting.

It definitely wins an award for being one of the most made - and worn - patterns I own and I'm still planning more as I write this! 

Monday, 12 January 2015

//PATTERN MAGIC KNOT DRESS


One day last November I was perusing the sewing section of my local library when I came across Tomoko Nakamichi’s Pattern Magic. I’d seen this book reviewed here and there on the internet, and while the diagrams looked somewhat intimidating I got it out anyway.

The ‘Knot dress’ (I prefer ‘bow') immediately stood out to me; it was something I would actually wear, as opposed to some of the more, er, avant garde designs in the book.

And so this dress was born!


Pattern

This pattern was actually pretty simple once I read through the book and familiarised myself with the diagrams and what they actually meant. I’d assumed that I would have to use my own block until I saw the one at the back of the book which I photocopied and traced. This essentially made the whole process patternmaking-by-numbers if you will; starting with their block and moving the lines a few centimetres at certain points, and extending these lines out into a dress length.
The bodice was slash and spread to create space for the tube which the bow is tied from. It was a little fiddly trying to make the gaps even and then trace around them.

I stuck to the pattern in the book except for a few changes:

  1. I added around 3cm to the length of the bow tube
  2. I didn’t add the small pleats at the back of the dress as I thought it would be better without
  3. I shortened the length to one I’m more comfortable with (I think I took off around 10cms)
  4. I straightened the bottom hem
  5. Once I put the dress on I decided to take some fabric out of the sides as it was a bit billowy for my liking. I think I took off around 7cms from each side, which gave it a more A-line shape.

Pleat-less back of the dress

Sewing

The instructions in the book for sewing the dress consist of literally one line:
“Sew the bow section into a tubular shape up to point c”
This left me slightly confused. A bit of playing around and this explanation helped. The base of the tube has a tricky curve to get around and I handsewed this together first as it looked impossible to do with only pins, machine stitched it, and then I was away! The rest of the dress was pretty straightforward to put together.


Exposed zip and shoulder darts

Finishing

I used some binding I’d made a while ago for the armholes and neckline, and an old zip I had lying around for an exposed zip at the back. For the hem, I overlocked the edge, folded it up 3.5cms and stitched it. I didn’t want to add any stiffness by double folding the hem.

Yay vs Nay

Yay

  • The shape of the dress is really flattering. The bow over the bust adds detail while the rest of the dress skims the hips and comes out to an A-line shape. The pleat is also handy; it gives extra move-ability and is pretty cute!
  • The biggest yay for me about the dress is the fabric I used. Formerly a $6 duvet cover, I suspect it’s mainly polyester with a little cotton. This was partially intended as wearable muslin but because it turned out so well it’s been upgraded straight to a regular wearable dress! Using a duvet cover for the fabric of this was also really useful because the pattern requires heeeaps of fabric if you opt to have the bow tube all-in-one with the bodice as in the book (as opposed to a separate pattern piece).
My "crisp" bow

Nay

  • My bow came out nothing like the picture in the book. It was limp and sad so I had to tack it in place to keep it looking crisp!
  • I know that Pattern Magic is primarily for patternmaking, but more detailed sewing instructions would have been handy, especially since the sewing method isn’t totally intuitive.
  • The fabric attracts cat hair like metal to a magnet. I’ve had to invest in some sticky lint removers exclusively for this dress!

Wearability

Overall, I'm really happy with how this dress turned out. I wear it relatively often, and the old canbedressedupordown rule applies!


I've made a list of other things I want to make out of the book, including another bow themed top, the intriguing deppari shirt, and another version of this dress in actual dress fabric.